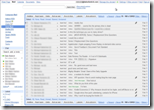
 With Google Apps’ Gmail you can set up personalized email addresses for yourself, up to 50 members of your family or 50 employees in your business, using an Internet domain you own and control – for free! Your email address will no longer be chained to your ISP or your web-based email provider such as Hotmail, Yahoo! or Gmail.
I have been using Google Apps to host my personal and professional ‘@daledietrich.com’ email (pictured above) for about a year now. In this post I provide detailed, step-by-step instructions on how to do this.
While Google Apps’ Gmail is completely free, to use it you must register your own domain. If you haven’t yet, you can register a domain with a Domain Host (‘DH’). I use GoDaddy. As of the date I write this, GoDaddy charges $9.99 U.S. ($9.99 on sale) for a one year registration of a DOT COM domain ($6.99 to transfer in an existing .com domain) and $10.69 for annual renewals.
Screenshots below were taken when I set up my ‘daleipshere.com’ domain to use Google Apps Gmail using GoDaddy.com as my DH.
Why Google Apps for Email?
A. Email Hosting for Any Domain – for Free: I used to pay $65 a year to have my @daledietrich.com email hosted by Elehost (a terrific ISP by the way). Now my @daledietrich.com, @daleisphere.com and @wishhh.com email is hosted on Google Apps for free!
B. Freedom from ISP Domains: Most personal email accounts use the ISPs domain – eg: yourname@comcast.com, yourname@rogers.com. This artificially locks users into a given ISP. If you wish to change your ISP you may be reluctant to do so because you’ll have to change your email address. If a move results in a change of ISP, you’ll have the additional hassle of changing your email address. But, when you set up a Google Apps Gmail account with your own custom domain, email accounts you set up for your family or business can be used forever – regardless of your ISP.
C. Best in Class Spam Filter – for Free: In the last year, only a half dozen or so spam emails have got past Google’s best-in-class free spam filter – with no false positives.
D. Up to 50 Users – for Free: The Standard Edition of Google Apps permits up to 50 users. Let’s say you used the domain ‘SmithFamily.com’. You could set up fifty email accounts such as Sam@SmithFamily.com & Sally@SmithFamily.com etc. for that domain. A small business could host customized emails for everyone – eg: Tom@PlumbingShop.com, Fred@PlumbingShop.com etc.
E. 7 Gigs of Space per User – for Free: Each of your users is given 7 Gigs of space (same as Gmail). As has happened in the past, I expect the free per-user capacity to increase over time in-lock-step with regular Gmail accounts.
F. Mobile Sync – for Free: Google now uses Microsoft Exchange to sync Google Apps Gmail, Contacts and Google Calendar to popular mobile devices such as a blackberry or an iPhone. (See: Google Turns on Exchange for iPhone and Windows Mobile Users.) [April 7, 2009 Update: Google App Gmail also works with the latest ‘faster, better Gmail for iPhone’ web-app.]
G. iMap Integration – for Free: Google’s IMAP for Gmail service allows you to sync email across any iMap compliant device. In my case, all the email I send and receive from any of my Outlook 2007 (desktop and laptop) accounts, my iPhone and the web – are all automatically synchronized, all the time. For example, if I send an email from my iPhone, that email appears in my ‘Sent Mail’ folders in Outlook (on both my PC and laptop) and on the web version of Google Apps – all accessible from any web browser, or any other iMap compliant device anywhere in the world. Free iMap support is what made me switch to Google Apps in the first place. I expect to write a separate post about this feature in the future. Here’s a demo on how to configure Outlook 2003 to interoperate with Google Apps Gmail via iMap.
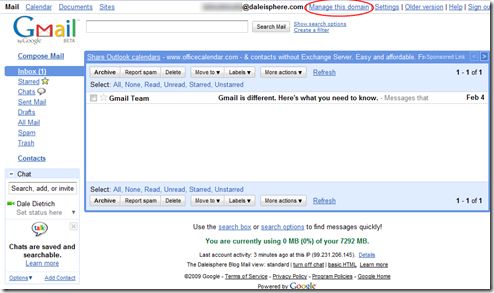
H. Works Just Like a Gmail Account: If you use Gmail, you already know how to use email within Google Apps. As you can see from the picture at the top of this post (click on it for a larger view), the environment is almost identical. There are subtle differences that the average users would never notice nor care about.
I. Works with any Pop3 or iMAP Email Client: In Step 9 below, I show you how to configure Google Apps Gmail for use with Outlook 2007. However, you can access Google Apps Gmail using any Pop3 or iMap compatible email client. Better yet, use the web-only Gmail client. The web-based Google App Gmail app is terrific. While I use Outlook 2007 as my primary way to access my Google App Gmail, I find myself using the web-interface more and more. And why not? Everything I do on the web is synced back with Outlook.
J. No Need for Corresponding Website: Let’s say you registered YourName.com. You can use Google Apps Gmail to host email accounts, such as me@YourName.com without ever having to set up a corresponding www.YourName.com website. If you so choose, you can also use Google Sites (which is part of the Google Apps suite) to host free websites on your domain. Google Sites is outside the scope of this post.
K. Beyond Email: Google Apps permits you, your family or your organization to do much more than just email – again, all for free. Google Apps features several Web applications with similar functionality to traditional office suites, including: Google Calendar (personal and shared calendars), Google Talk (instant messaging), Google Docs (documents and spreadsheets) and Google Sites (websites). These are outside the scope of this post. Suffice it to say, once you’ve started with Google Apps Gmail, you’ll likely find some of the other apps compelling – I personally use its calendar, talk and docs apps frequently.
L. De-facto Email Backup: If you use Google Apps Gmail via the web or with iMap, instead of via POP3 as described below, your email is automatically backed up by by Google.
Before You Begin – Integration With Your Domain Host
This post assumes you already have secured a domain using a Domain Host (‘DH’). Below I describe the changes you’ll need to make to your DH’s configuration settings (including MX & CNAME Records) for Google Apps Gmail to work. Virtually every DH allows users to modify these settings. Google maintains specific instructions on how to change MX records for about 50 different Domain Hosts (click on Section 3 in the link to find the instructions that apply to your DH). If you don’t know what these records are – don’t worry. They are just fields that need to be filled-in or edited on an online form. I give examples of how to do this on GoDaddy.com below. The process is similar with all other DH’s. It’s pretty easy.
If you have not yet secured a domain, I suggest using one of the 50 or so Domain Hosts listed in Section 3 of the link mentioned above to make integration with Google Apps easier.
I use GoDaddy in the examples below. Click on any image below for a larger view. Once you have secured your domain, you are ready.
[Note: The processes for adding/amending GoDaddy CNAME and MX records below assume Godaddy is your registrar and that you have not hosted a website on your domain elsewhere than with GoDaddy. If GoDaddy is your domain registrar, but you host your site elsewhere, you’ll need to edit your CNAME and MX records through your web-hosting ISP’s account settings dashboard.]
Let’s begin…
Step 1: Sign Up
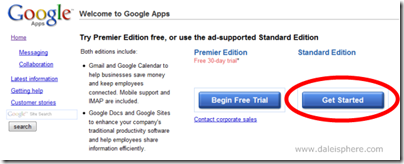
To signup, click here. on the blue ‘Get Started’ button under the ‘Standard Edition’ heading on this Welcome to Google Apps page:
[July 7 2009 Update: The ‘Get Started” button depicted above is now gone from the main Google Apps page. A similar Get Started button appears on the Standard Edition description page. Or just Start here on the sign up page pictured below. For details on this change see: What the Hell Happened to the Free Version of Google Apps.]
Check of the ‘Administrator’ radio button, fill in your domain and click on the ‘Get Started’ button:
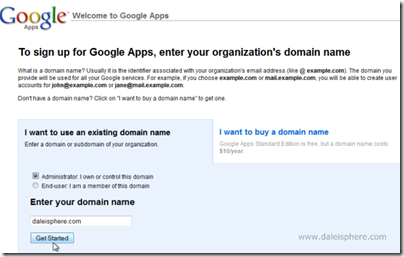
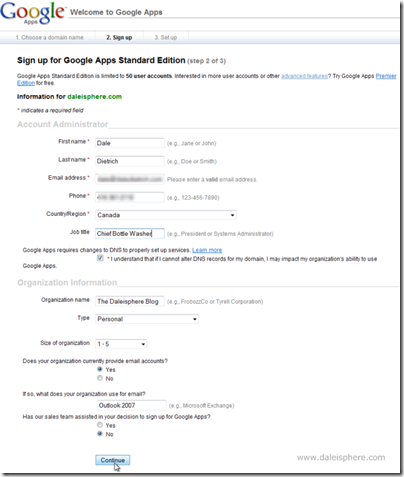
Fill in the account administrator and organization information fields as necessary and click the ‘Continue’ button (click image for larger view):
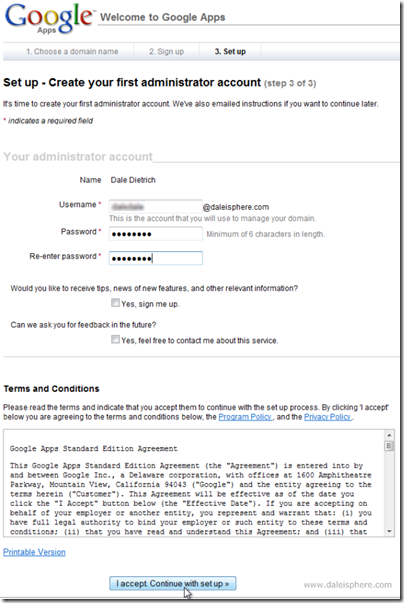
Fill in the administrator account info, click on the ‘I accept. Continue with set up’ button (if you accept):
Note: The administrator Username and Password you input here will be the default email username and password that you will use in Step7 below – once you get everything set up. Write it down somewhere.
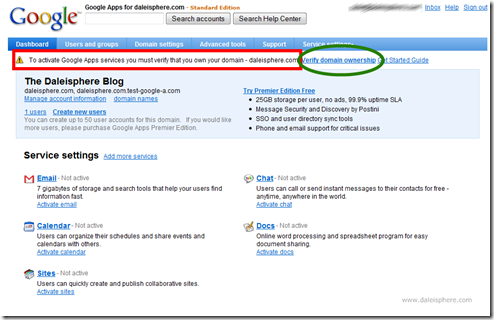
You’ll next be taken to the Google Apps dashboard (pictured below). An email will also be sent to you explaining the next steps. The email will contain a link you can click on to get back to the Google Apps dashboard in the future (click image for larger view):
IMPORTANT NOTE: The dashboard URL you’ll be taken too (and in the email) is a temporary Google Apps URL for your dashboard. If you close your browser during this process, you can get back to your dashboard through the email or by using the following temporary URL:
www.google.com/a/cpanel/<your domain>/Dashboard
where <your domain> is your particular domain – including the top-level-domain part (eg: .com) . For example, my temporary Daleisphere dashboard URL was:
www.google.com/a/cpanel/daleisphere.com/Dashboard
I strongly suggest you save the temporary URL as a bookmark until you are finished this tutorial. You’ll be going back to the dashboard several times in this tutorial.
Once you finish setting up and activating the email on your domain (as described below) you’ll be able to access your Google Apps’ Gmail and dashboard through an URL specific to your domain. For example, I access my Daleisphere email through this subdomain/alias: email.daleisphere.com.
I show you how to set up a permanent URL in Step 7 below. Until then you’ll use the temporary URL.
Step 2: Domain Ownership Verification Process
Next you’ll need to verify that you own your domain. Note the verification notice that appeared on the dashboard (pictured above):
![]()
Click on the ‘verify domain ownership’ link circled in green above. You’ll be taken to the verification page pictured below (click image for larger view):
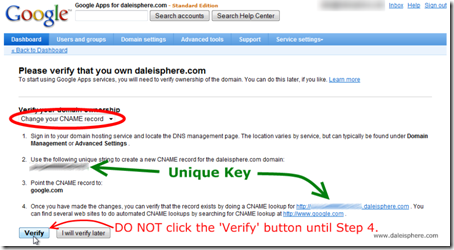
There are two methods of verifying domain ownership. The first, ‘Upload an HTML file’ is the easiest but assumes you have a website setup on your domain. For the purpose of this post I’m assuming you do not have a website set up on your domain.
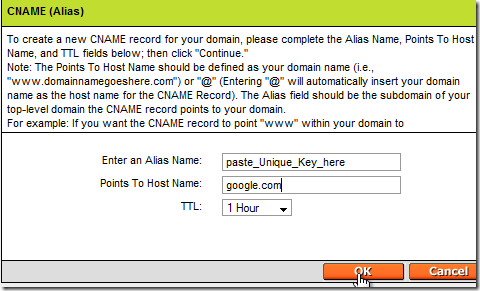
The second method requires you to ‘Change a CNAME record’ with your Domain Host. Select that option from the pull-down menu (circled in red above). Instructions for how to do this appear below the pull-down menu as shown in the image above. The 2nd bullet point in the instructions include a ‘Unique Key’ (see above). You’ll need to copy and paste that unique key into a temporary CNAME record on your domain. I explain how to do this in Step 3.
Note: Do not click the ‘Verify’ button yet (we’ll do that in Step 4). Keep this page open while completing Step 3. We’ll be coming back to it. Either open up a new browser instance or open a new tab in your browser to complete Step 3.
Step 3: Adding a Temporary Verification CNAME Record in your Domain:
The process of adding/editing CNAME records is slightly different from one Domain Host to another. Google has general ‘Creating CNAME records’ instructions here. Click on the ‘Specific Instructions for popular domain hosts’ section in that link to get instructions for more than a dozen domain hosts. For example: Here are the instructions for adding a CNAME record in GoDaddy.com. If your domain host isn’t on the list, review the instructions for another domain host and do the best you can – there’s really not much to it.
Ultimately what you are doing here is:
- creating a new CNAME record (just a new entry in a database(;
- giving it the ‘Unique Key’ name identified ab0ve; and
- fling in the blank to ‘point it to’ google.com
Here’s how to do this in GoDaddy.com. Note: I’m following these instructions with a few more pictures:
- Log in to your account at www.godaddy.com.
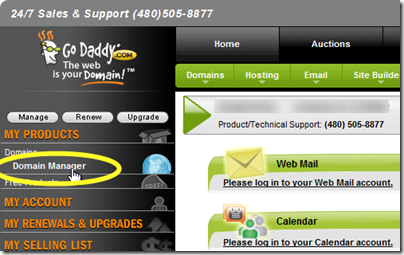
- Click on the Domain Manager link (circled in yellow below):
- Click the domain (eg: circled in red below) that you intend to use with Google Apps Gmail. If you just registered your first domain, there will be only one to choose from:
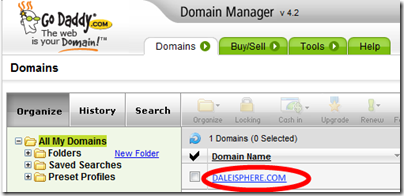
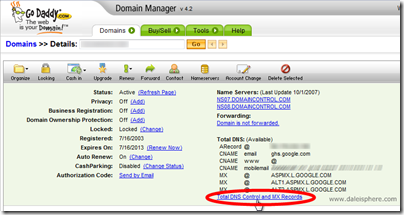
- Click the Total DNS Control And MX Records link (circled in red below – click image for larger view):
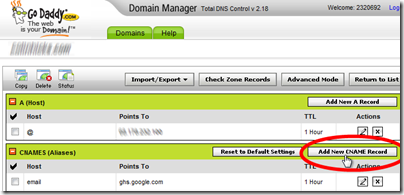
- Click the ‘Add New CNAME Record’ button:
- Paste the ‘Unique Key’ that Google Apps provided in Step 2 above into the ‘Enter an Alias Name’ box below. Type ‘google.com’ in the ‘Point to Host Name:’ box below. Leave the default TTL field as it is. Click on the orange ‘OK’ button:
You should see your temporary CNAME entry (circled in red) in the CNAME table that looks something like this: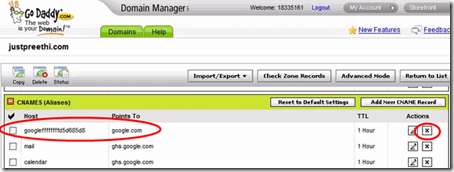
Note the X circled in red on the right. When you finish the verification process we’ll come back here (at the end of Step 4) to click on that X to delete the temporary CNAME verification entry. - Wait until ‘Pending Setup’ Message Clears: It may take a few minutes for the CNAME to be processed. If this is the case you’ll see a ‘Pending Setup’ message under the ‘Actions’ column on the right (instead of the icons you see in the image above) while GoDaddy processes the temporary CNAME verification entry. Refresh this page every few minutes until the ‘Pending Setup’ message disappears and the checkboxes show up as depicted in the table above. Do not proceed until this is cleared. This typically took about 2 minutes to clear for me.
Step 4: Back to Google Apps for Verification
Click ‘Verify’ Button: Once you have added the temporary CNAME alias using the ‘Unique Key’ that Google Apps provided in Step 2, you can click the ‘Verify’ button on the Google Apps verification screen that we left open at the end of step 2 above.
You’ll be returned to the Google Apps dashboard and you’ll see the following notice (highlighted in school bus yellow below):
“We are checking domain ownership. This may take 48 hours to complete”.
I’ve done this 6 times now and it never took anywhere near 48 hours.In my experience this process takes from 30 minutes to 2 hours. Refresh the page every half hour or so until the notice goes away. Once the notice is gone, your domain has been verified and you can continue to Step 5.
Delete Temporary CNAME Alias: Once your domain has been verified you can go back to your GoDaddy CNAME table and delete the temporary verification CNAME entry by clicking on the x (circled in red in point 6 of Step 3 above) beside the temporary alias. Note: You don’t have to delete the temporary CNAME alias. It’s just a good practice to keep you records tidy.
Step 5: Activating Email – Configuring Your MX Records
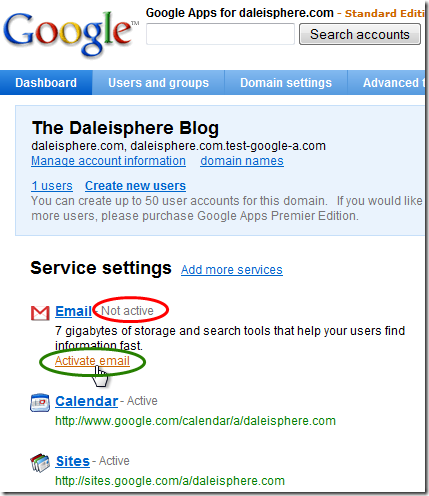
Once verified, you’ll need to complete one more step to activate your email. Notice the ‘Not Active’ notice circled in red beside the blue ‘Email’ link on your dashboard (pictured below). Click on the ‘Activate email’ link (circled in green below) to activate.
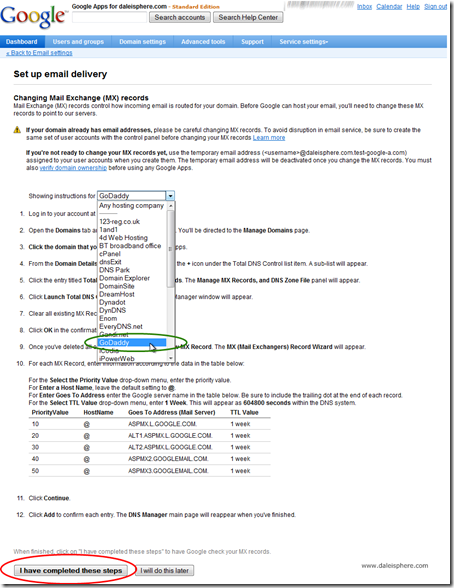
On the page that follows, you’ll find instructions on how to set up your Mail Exchange (‘MX’) records on your domain host. As you can see below, I selected the instructions for GoDaddy (click image for larger view):
You’ll need to follow the instructions that appear on that page – the GoDaddy instructions are shown in the image above and stepped through below. Adding/Editing MX Records is as easy as creating/editing a CNAME Alias – what you just did.
Note: Do not click on the ‘I have completed these steps’ button circled in red above until you have completed the applicable steps for your Domain Host.
By way of example, below is how to setup MX Records on GoDaddy.com. If you are not using GoDaddy, follow the instructions that apply to you and skip to Step 6 below.
Note: I’m following these instructions with a few more pictures:
- Follow points 1 through 4 in Step 3 above.
- If there are any entries in the MX records column delete them all first (by clicking on the ‘x’ box beside each existing entry (see picture below)).
- You’ll be clicking on the ‘Add New MX Record’ tab (circled in red below) five times, filling in the rows so they look EXACTY like this when finished – it doesn’t matter whether you use upper or lower case (click image for larger view):
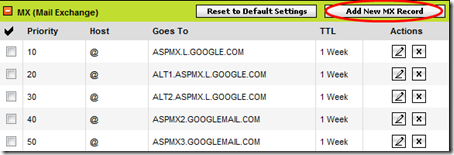
NOTE: The exact number and content of MX records you’ll need to enter varies depending on your domain host. Be sure to find the exact records you’ll need to add from Section 3 on Google App’s Configuring MX Records page available here.
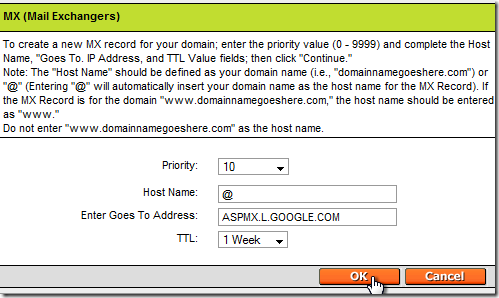
- In GoDaddy, each time you click on the ‘Add New MX Record’ button you’ll fill in the contents of each row with this dialogue box:
- You’ll get the ‘Pending Setup’ message again (just like after you created the temporary CNAME record) after you add each. These should clear up in a few minutes.
Step 6: Checking MX Records
After adding/editing your MX Records, click on the ‘I have completed these steps’ button circled in red on the Google Apps ‘set up email delivery’ page (shown in the image above). After clicking, you’ll be returned to the Google Apps dashboard where you’ll see this ‘Email’ – Updating’ message:
Once again, it won’t take 48 hours. If you followed the instructions in Step 5, this shouldn’t take more than a couple hours (and possibly only a few minutes). Refresh periodically (every 10 minutes or so) until you see the following ‘Email – Active’ indication on the Google Apps dashboard:
When you see the ‘Email – Active’ message your Google Apps’ Gmail account is set up and good to go. Congrats!
Step 7: Add Shortcut (subdomain) to Your Email on the Web
Your domain is set up, your email is activated, but how do you access the Google Apps Gmail screen on the web? As with the lengthy and easily forgettable temporary Google Apps dashboard URL discussed in Step 1 above, Google supplies an equally forgettable URL you and your users can use to get to your Google Apps Gmail inbox:
mail.google.com/a/<yourdomain> (depicted in green in step 7.1 below)
where ‘yourdomain’ is to be substituted with your domain name.
You can use that, and bypass this Step 7, if you wish. But I suggest setting up an URL that is easier to remember. That is the objective of this Step 7 . I suggest this form:
email.<yourdomain>
For example, I use email.daleisphere.com to access my info@daleisphere.com email through Google Apps.
To do this, you need to:
- tell Google what alias you’ll be using;
- create a permanent CNAME alias with your Domain Host, just like we did to create the temporary validation CNAME alias in Step 3 above; and
- tell Google Apps that you completed the CNAME creation steps.
7.1. Telling Google Apps The Web Address You’ll be Using to Access Gmail:
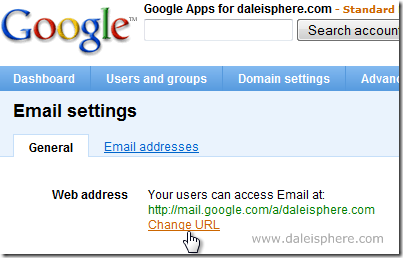
From your Google Apps dashboard click on the blue Email link. Before you do, notice the temporary email access link in green below the Email link . We’re going to change that now.
 After clicking on the blue Email link you’ll see this screen:
Click the red ‘Change URL’ link to bring up the following screen:
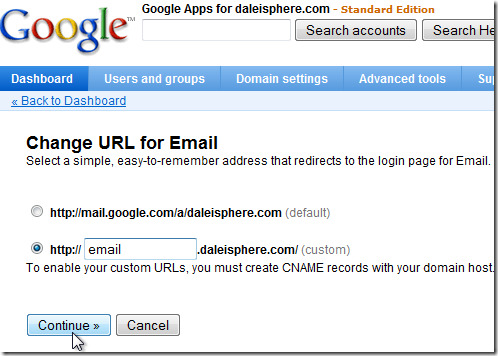
Click the second radio button option, type in the alias/subdomain you want to use and click the ’Continue’ button. Notice that I use the ‘email’ alias. You can choose any alias. If you do, modify the instructions below accordingly. I think ‘email’ makes logical sense.
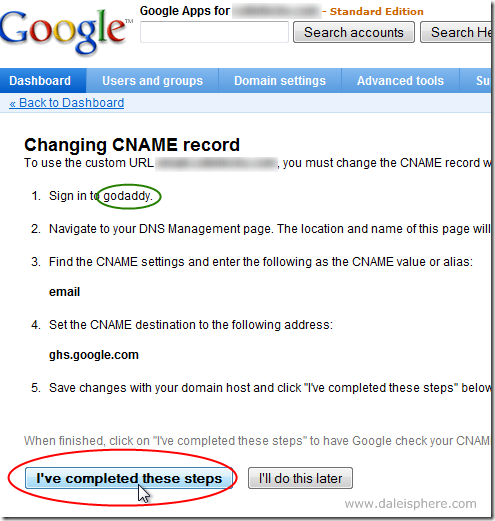
The screen that appears next may provide instructions for your particular Domain Host. It knows your Domain Host at this stage (notice godaddy circled in green below) because you told it what your Domain Host was when up set up your MX Records above.
STOP! DO NOT CLICK the ‘I’ve completed these steps’ button until you set up the CNAME described in section 7.2 below.
7.2 Creating Another CNAME Alias with Your Domain Host:
Once again, the process of adding/editing CNAME records is slightly different from one Domain Host to another. As before, click on the ‘Specific Instructions for popular domain hosts’ section here to get instructions if Google Apps doesn’t give you instructions for your particular Domain Host on the ‘Changing CNAME record’ page above. In any event, the process is identical to the process you used to set up the temporary verification CNAME alias in Step 3 above.
I’ll be using the GoDaddy example once again:
- Follow items 1 through 5 in Step 3 above – which will result in your opening a new CNAME (Alias) dialogue box.
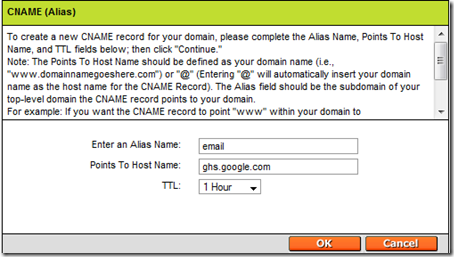
- This time the CNAME alias (ie: a subdomain) named ‘email’ will be added and we’ll be point it to: ghs.google.com by filling in the blanks as shown below (again leave the TTL field at its default):
- Click OK and wait for the ‘Pending Setup’ notice to disappear.
7.3 Tell Google Apps that you completed the CNAME creation steps
Now go back to Google Apps and click on the ‘I’ve completed these steps’ button shown in step 7.1 above.
7.4 Testing / Using your New Alias (Web Address) to Access Google Apps Gmail
Type:
‘http://email.<your domain>’
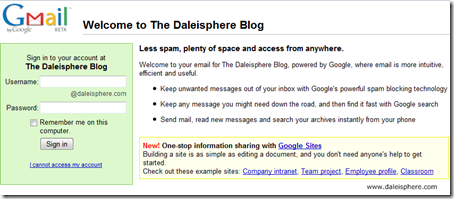
into any web browse and press ‘Enter’. ‘<your domain>’ is replaced, of course, with your particular domain (in my case I type in http://email.daliesphere.com). You’ll see a login screen like this:
Save that URL in your bookmarks. This URL is your (and your users) permanent entryway into your Google Apps Gmail and dashboard.
Type in the administrative username and password you entered in Step 1. and you’ll be presented with your Google Apps Gmail screen:
Take a look around. Enjoy.
7.5 Manage Your Domain
A ‘Manage this Domain’ link is circle in red above. Clicking on that link takes you to your Google Apps dashboard. If you wish you can setup another CNAME to take you directly to the dashboard. However, I haven’t bothered to do this personally (and don’t describe that process here) because the dashboard is always just one click away when I’m using Google Apps Gmail. You can also continue to use the ‘temporary’ URL discussed in Step 1 above to get to the Dashboard. But I never do. The ‘Manage this Domain’ link is all I need.
7.6 You’re Done?
If: (i) you are the sole user of your domain; (ii) you intend to use just the web-based Gmail front-end (shown above) to access your Google Apps Gmail account; and (iii) you do not want to have email from your old email account forwarded to your new account; this can be the end of the tutorial for you.
Keep reading, however, if you want to add additional email accounts/users to your domain, if you want to use Google Apps Gmail with Outlook 2007 via a POP3 account and/or to see you how to set Google Apps Gmail up to access email from your old email account as you transition away from it.
Step 8: Adding Users
If you are the only person using your domain, you can use the administrator email/user account you created in Step 1 above. Or, if you choose, you can add up to 50 users with 50 unique email addresses with the free Standard Edition of Google Apps.
Here’s how:
- click the ‘User and groups’ tab on the dashboard
- click the ‘Create a new user’ link
- enter the user’s first and last name along with a unique username
- record (copy and paste) the Google Apps generated temporary password somewhere – you’ll be providing this to the user in order for them to login later (they can change their password at any time)
- click the ‘Create new user‘ button
- notify the new user of their userid, password and how to access the email (ie: via the custom ‘http://email.<your domain>’ alias you tested in step 7.4 above)
- Repeat as needed
Step 9: Configuring Outlook 2007 for POP3 Access to Google Apps Gmail
In this section I describe how to configure Outlook 2007 to work with Google Apps Gmail.
If you use another email client Google provides this Supported POP client list page that provides instructions on how to configure other popular email clients.
Below I follow Google’s instructions for how to configure Outlook 2007 for use with Google Apps Gmail.
[Note: While I describe how to set up a POP3 connection here, if you intend to use/access your email from multiple devices, setting up an iMAP connection is a preferable connection method – See benefit ‘G’ at the top of this post. In the future, I hope to write a follow-on post to this one describing how to do this.]
9.1 Configuring POP3 Settings on the Google Apps Gmail Page:
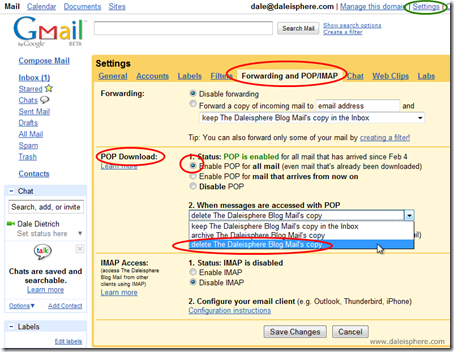
- Click Settings at the top of any Google Apps Gmail page (circled in green below).
- Click the Forwarding and POP/IMAP tab.
- In the ‘Pop ‘Download’ row:
- select Enable POP for all mail or Enable POP for mail that arrives from now on; and
- choose the action you’d like your Gmail to take after new emails are downloaded to your POP3 client (in my example Outlook 2007). Unlike when I use iMAP, when I use POP3 accounts l do not want a copy left on the server so I chose the ‘delete The Daleisphere Blog Mail’s copy…’ option circled in red below
(click image for larger view)
- Click the ‘Save Changes’ button
9.2 Configuring the Outlook 2007 Client:
Remember: If not using Outlook 2007, you can get instructions for your email client through this Supported POP client list page.
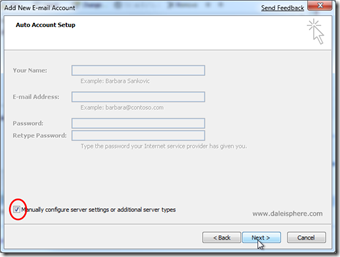
Auto Setup does not work with Google Apps Gmail accounts.
Instead check the ‘Manually configure server settings or additional server types:’ checkbox (circled in red above) and click the ‘Next >’ button
Select the “Internet E-mail’ option on the next page and click ‘Next’
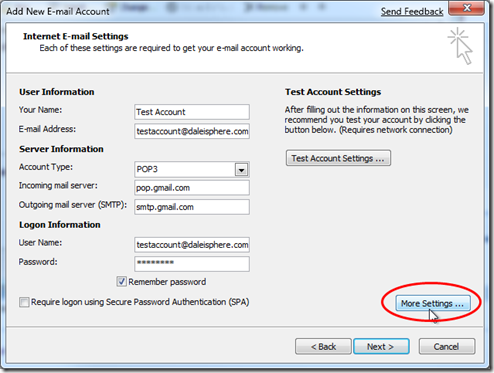
– Your Name: Enter your name as you would like it to appear in the From: field of outgoing messages (for the purpose of this tutorial I added ‘Test Account’ in the image below).
– Email Address: Enter your full email address (ie: with the username you set up in Step 1 above) in the format username@your_domain.
– Account Type: Select POP3 from the pull-down menu
– Incoming mail server: Set to ‘pop.gmail.com’
– Outgoing mail server (SMPT): Set to ‘smtp.gmail.com’
– User Name: Enter your full email address (ie: with the username you set up in Step 1 above) in the format username@your_domain.
– Password: Enter the password you entered in Step 1 above.
- Click on the ‘More Settings…’ button circled in red above.
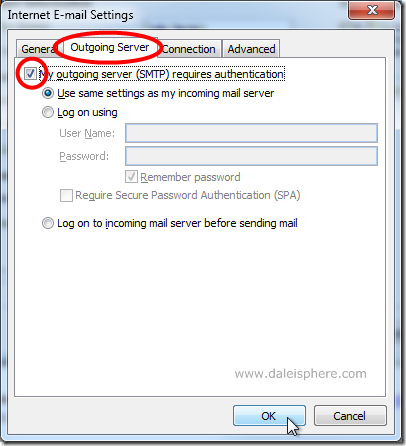
- On the next screen, click the ‘Outgoing Server’ tab (pictured below)
- Click on the ‘My outgoing server (SMTP) requires authentication’ checkbox
- click ‘OK’
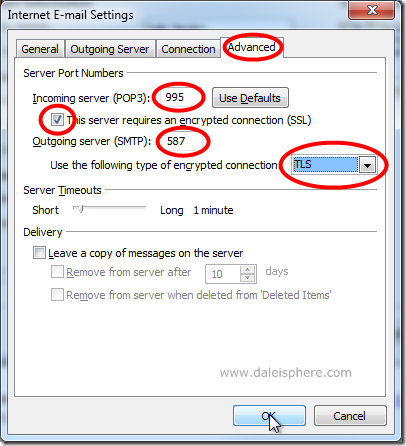
- Click the Advanced tab, and check the box next to This server requires an encrypted connection (SSL) under Incoming Server (POP3).
- In the Outgoing server (SMTP) box, enter 587, and select TLS from the drop-down menu next to Use the following type of encrypted connection (all as shown below):
Congrats!
From now on you should be able to send and receive email using your new Google Apps Gmail account with Outlook 2007. If you experience problems you can check Google’s Common Errors or Troubleshooting pages.
Step 10: Transitioning Away from your Current ISP Account
Once you are all set up and tested, you can notify everyone in your contacts list that your email account has changed. In my real world experience, many people need constant reminders to make the switch.
After making the switch, you can set your up your Google Apps account to be a POP3 client of your old email account, automatically importing emails sent to the old email address into your new email account. As you see these coming in, you can remind those folks once again that your email has changed.
Here’s how:
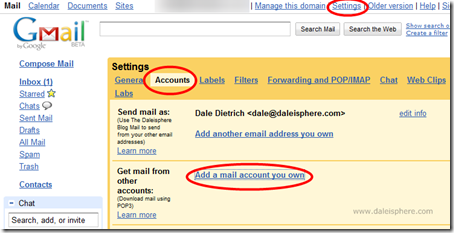
From the ‘Accounts’ tab on the ‘Settings’ screen from your Google Apps Gmail screen, click on the blue ‘Add a mail account from your own’ link in the ‘Get mail from other accounts’ row (all as shown below):
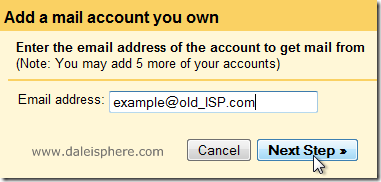
That will bring up the following ‘Add a mail account you own’ screen:
Fill in your old email address here and click the ‘Next Step >>’ to bring up the next screen:
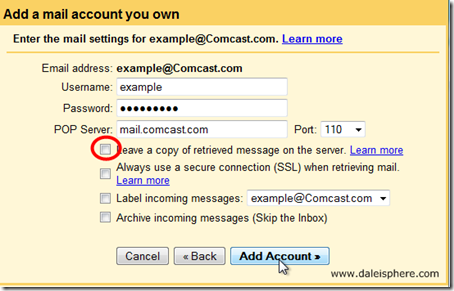
Depending on your ISP, Google will pre-populate these fields as best it can. However, you’ll need to be sure they filled in exactly as they are in your email settings tabs/fields in your current email client. Of course, the password will need to be added by you. Typically your ISP will have provided you with this information on a sheet of paper back when you first set up your Internet connection. This information is typically available from the customer support folks if you lost it.
Finally, I recommend, ‘not’ leaving a copy of the old email on the old server. Hence the unchecked box circled in red in the image above.
Click on the “Add Account >>’ button to complete the process.
Test it out by sending some email to your old email address to ensure that it comes into your new Google Apps Gmail account. If/when it does, you can confidently remove your old ISP information from your email client – you won’t need it any more. Once this is working, you can rely on Google Apps Gmail to retrieve residual email coming into your old email account during the transition process.
One Ironic Gotcha – No Direct Migration from Gmail
If you are an existing regular Gmail user, Surprisingly, you can’t, just migrate your Gmail account or Google calendar to a Google Apps account (you’d think Google would set it up that way but as of the date I’m writing this (March 23, 2009) they haven’t). When I first looked into this there were free and paid tools available online to do the migration if you wish – I couldn’t quickly find them when I just searched again.
In my case, since I had used iMAP with GMail before I made the switch to Google Apps, I set up the new account with IMAP, dragged and dropped the folders from my current gmail/IMAP account within Outlook to the folders set up for my new Google App account. IMAP synced everything right back up. The whole migration took me about 30 minute to pull off. That would be my recommended approach, even if you ultimately never use iMAP again.
Feedback
I hope this tutorial was helpful. I always enjoy feedback and would be happy to answer questions you might leave in the comments section below.




Fantastic, it is one of the two or three that I’ve put the most effort into. I’m glad people are finding it useful.
This is simply one of the best tutorials I’ve ever read. Thanks for your detailed and clear instructions. nnbest of luck to you in life and business!
Helped you too much? :)rnrnThanks for the positive feedback … it keeps me going!
very very very good post.. its help me too much..rnrnthanksrnmehedirnhttp://www.mehedibd.com
Yupp, i just notice themes being available as of yesterday. I don’t particularly like any of them. I’m happy with the default.
Half way there. To update my comment about themes not being available for Google Apps starting today it’s available for mail side. Nothing yet for Personalized Start Page.rnrnhttp://www.downloadsquad.com/2009/04/01/gmail-themes-finally-come-to-google-apps/
POP3 clients usually have an option during the setup process to leave email on the server or not. When I use POP3 I always choose NOT to keep email on the server.rnrnThat said, if you intend to use POP3, that usually means you won’t be using the web based emai. When I first set this up I used POP3. That was before Google supported IMAP. From that point on I used IMAP.rnrnI do hope to write another piece on how to set up Google Apps Gmail with IMAP. Just no time right now.rnrnAs for backups, if you are NOT using POP3 and just using the web, there is no need for a backup – Google keeps things backed up. If you are using a POP3 client, then you just need to backukp the underlying data files from time to time. Each client is going to have a different file system for where the files are stored.rnrnWith Outlook 2003/2007 you can use the “Personal Folders Backup” utility. See my article on the topic here:rnrnhttps://www.daleisphere.com/automatic-outlook-2007-email-backups-sort-of/rnrn…Dale
This is an excellent article – am seriously considering changing my personal domain & company domain to use Google Apps GMail.rnrnOne thing I don’t understand is the use of the POP3 client. I currently use Pegasus. If I use a POP3 client to download an email, I presume the philosophy of GMail still stands & the email will not be deleted from the server? If so, how do I ensure Pegasus (or other email client) won’t try to download it again the next time I log on?rnrnAlso, any way to do a complete backup? I guess I could filter all incoming to an additional email account.
Thanks for the comment Jonny. Indeed, I’ve noticed other minor differences here and there. But for the most part GA Gmail and regular GM are the same.
Good article. I’ve been using Google Apps for 4 or 5 months now and I can’t say enough praises about the service. I’ve been recommending it to everyone I know who owns a domain. rnrnOne thing to note is that Themes for mail and start pages are not available. Not a biggie but just though I would throw it out there.
Ha! Good catch Josh! I must have done that subliminally! I’ll try to remember to make that change on my next revision! 🙂 But I kinda like the little ‘i’. Perhaps Steve has more influence over me than I thought! 🙂
I’ve tried that spoofing approach in the past. Problem is, I forget to use it. When I have to ‘remember’ to choose which email address I’m sending from, after a day or two I just give up and use the default – or, as I said, forget and send ‘from’ the wrong account. nnBut hey, if your solution works for you, there’s certainly no reason to change it. nnI love my solution primarily due to its ability to integrate with iMAP and my iPhone, because of its wonderful spam filter and the fact that its free. But for those four facts I likely never would have bothered.nn…Dale
I can *mostly* use my own domain with Gmail as well. In one or two email clients, it’s not as clean as true hosting. But it’s good enough for the occasional use and in most email. Until I own zatz.com, it’s not worth telling everyone a new address. Here’s a pic from the Gmail config screen:rnrnhttp://www.zatznotfunny.com/wordpress/wp-content/uploads/2009/03/gmail-accounts.jpgrnrnAgain, it’s not real but it spoofs in most cases.rnrnThe Zimbra portion I’m talking about is a clunky and buggy Mac OS X desktop client (Yahoo bought the company). Maybe with a later release I’ll attempt also adding a Gmail account to it and sliding folders around. But I’ll wait for a more mature client.
I just checked out Zimbra on Wikipeida:rnrnhttp://en.wikipedia.org/wiki/ZimbrarnrnIt says that it can work with Outlook. So if you can get your zimbra email/calendar out of zimbra and into Outlook then you can sync that all back up to Google Apps Gmail via iMap and Google Calendar sync
If you ever do choose to migrate to davezatz@gmail why not follow this guide and move to dave@davezatz.com or to dave@zatz.com or dave@zatznotfunny.com. Google Apps Gmail is identical to Gmail except you can use your own domain.rnrnI’ve never used Zimbra so I’m not aware of its limitations.rnrnIf you can get your zimbra email to a client that can do iMap (ie: Thunderbird, Outlook 2007 etc.) then you can use iMap to sync that back up to any gmail or google apps gmail account. rnrnFYI, I also sync my Outlook calendar to Google Apps Calendar with Google Calendar Sync. I may update the post above to include instructions on how to do that too.rnrn
I’m perfectly happy with davezatz@yahoo. Every now and then I’ll give out dave@zatznotfunny to certain organizations or companies – and I’ve set up gmail to fake sending from it well enough (not true hosting, through the regular gmail account). The only thing that really kills me with Yahoo is no desktop IMAP (there’s mobile IMAP access) even by being on a paid account. The spam filter is pretty good though it sometimes flags my own mail. :/ I’ve thought of migrating to gmail (davezatz@gmail) a few times, but with no desktop IMAP (outside of Zimbra) I have no easy path.
Indeed you can go a long way to stopping people from spoofing your email address. For Google Apps hosted emails, create an SPF record TXT file with your domain host containing the following:nn v=spf1 include:aspmx.googlemail.com ~allnnI was going to add this in to a later update, but since you asked.nnFor more on SPF records and why they work, check out:nn http://en.wikipedia.org/wiki/Sender_Policy_FrameworknnA couple years back my DaleDietrich.com domain fell victim to massive email spoofing. It took me several months to seek out this SPF record solution. I use it with all my email domains now. Since then Leo Laporte and Steve Gibson have talked about it on their ‘Security Now’ podcast episodes, including episode 96:nnhttp://www.grc.com/sn/sn-096.htmhnn(the link above is to the podcast transcripts – search for SPF to read the relevant parts)nnSPF records are unique to whatever your outgoing email host is (ie: the one you set your SMTP settings too) so you can’t just copy the one I quote above if you are not using Google Apps Gmail. A quick Google search should result in the appropriate record for your email provider. Also, the podcast transcript refers to a Microsoft wizard that can be run to generate the appropriate SPF record for your context.nn…Dalen
Pretty cool trick, the cost of the domain name is next to nothing compared to the hosting plan. Now if you can only figure out a way to stop people from spoofing email addresses, I’d be all set.
Cool, let me know how it goes. I’ve done this a half dozen times now and will be doing a couple more this week. If you have any problems, I’m the guy to ask.rnrnGood luck.
Wow, that is a heck of a how-to. I think I’m going to try this for a GeekTonic e-mail address
Wow, that is a heck of a how-to. I think I'm going to try this for a GeekTonic e-mail address
Cool, let me know how it goes. I've done this a half dozen times now and will be doing a couple more this week. If you have any problems, I'm the guy to ask.
Good luck.
Pretty cool trick, the cost of the domain name is next to nothing compared to the hosting plan. Now if you can only figure out a way to stop people from spoofing email addresses, I'd be all set.
Indeed you can go a long way to stopping people from spoofing your email address. For Google Apps hosted emails, create an SPF record TXT file with your domain host containing the following:
v=spf1 include:aspmx.googlemail.com ~all
I was going to add this in to a later update, but since you asked.
For more on SPF records and why they work, check out:
http://en.wikipedia.org/wiki/Sender_Policy_Fram…
A couple years back my DaleDietrich.com domain fell victim to massive email spoofing. It took me several months to seek out this SPF record solution. I use it with all my email domains now. Since then Leo Laporte and Steve Gibson have talked about it on their 'Security Now' podcast episodes, including episode 96:
http://www.grc.com/sn/sn-096.htmh
(the link above is to the podcast transcripts – search for SPF to read the relevant parts)
SPF records are unique to whatever your outgoing email host is (ie: the one you set your SMTP settings too) so you can't just copy the one I quote above if you are not using Google Apps Gmail. A quick Google search should result in the appropriate record for your email provider. Also, the podcast transcript refers to a Microsoft wizard that can be run to generate the appropriate SPF record for your context.
…Dale
I'm perfectly happy with davezatz@yahoo. Every now and then I'll give out dave@zatznotfunny to certain organizations or companies – and I've set up gmail to fake sending from it well enough (not true hosting, through the regular gmail account). The only thing that really kills me with Yahoo is no desktop IMAP (there's mobile IMAP access) even by being on a paid account. The spam filter is pretty good though it sometimes flags my own mail. :/ I've thought of migrating to gmail (davezatz@gmail) a few times, but with no desktop IMAP (outside of Zimbra) I have no easy path.
If you ever do choose to migrate to davezatz@gmail why not follow this guide and move to dave@davezatz.com or to dave@zatz.com or dave@zatznotfunny.com. Google Apps Gmail is identical to Gmail except you can use your own domain.
I've never used Zimbra so I'm not aware of its limitations.
If you can get your zimbra email to a client that can do iMap (ie: Thunderbird, Outlook 2007 etc.) then you can use iMap to sync that back up to any gmail or google apps gmail account.
FYI, I also sync my Outlook calendar to Google Apps Calendar with Google Calendar Sync. I may update the post above to include instructions on how to do that too.
I just checked out Zimbra on Wikipeida:
http://en.wikipedia.org/wiki/Zimbra
It says that it can work with Outlook. So if you can get your zimbra email/calendar out of zimbra and into Outlook then you can sync that all back up to Google Apps Gmail via iMap and Google Calendar sync
I can *mostly* use my own domain with Gmail as well. In one or two email clients, it's not as clean as true hosting. But it's good enough for the occasional use and in most email. Until I own zatz.com, it's not worth telling everyone a new address. Here's a pic from the Gmail config screen:
http://www.zatznotfunny.com/wordpress/wp-conten…
Again, it's not real but it spoofs in most cases.
The Zimbra portion I'm talking about is a clunky and buggy Mac OS X desktop client (Yahoo bought the company). Maybe with a later release I'll attempt also adding a Gmail account to it and sliding folders around. But I'll wait for a more mature client.
Just so you know, the word “IMAP” is a standard acronym, not an Apple marketing word. The “I” at the beginning should be capitalized just like every other letter. 🙂
Ha! Good catch Josh! I must have done that subliminally! I'll try to remember to make that change on my next revision! 🙂 But I kinda like the little 'i'. Perhaps Steve has more influence over me than I thought! 🙂
Good article. I've been using Google Apps for 4 or 5 months now and I can't say enough praises about the service. I've been recommending it to everyone I know who owns a domain.
One thing to note is that Themes for mail and start pages are not available. Not a biggie but just though I would throw it out there.
Thanks for the comment Jonny. Indeed, I've noticed other minor differences here and there. But for the most part GA Gmail and regular GM are the same.
This is an excellent article – am seriously considering changing my personal domain & company domain to use Google Apps GMail.
One thing I don't understand is the use of the POP3 client. I currently use Pegasus. If I use a POP3 client to download an email, I presume the philosophy of GMail still stands & the email will not be deleted from the server? If so, how do I ensure Pegasus (or other email client) won't try to download it again the next time I log on?
Also, any way to do a complete backup? I guess I could filter all incoming to an additional email account.
POP3 clients usually have an option during the setup process to leave email on the server or not. When I use POP3 I always choose NOT to keep email on the server.
That said, if you intend to use POP3, that usually means you won't be using the web based emai. When I first set this up I used POP3. That was before Google supported IMAP. From that point on I used IMAP.
I do hope to write another piece on how to set up Google Apps Gmail with IMAP. Just no time right now.
As for backups, if you are NOT using POP3 and just using the web, there is no need for a backup – Google keeps things backed up. If you are using a POP3 client, then you just need to backukp the underlying data files from time to time. Each client is going to have a different file system for where the files are stored.
With Outlook 2003/2007 you can use the “Personal Folders Backup” utility. See my article on the topic here:
https://www.daleisphere.com/automatic-outlook-20…
…Dale
Half way there. To update my comment about themes not being available for Google Apps starting today it's available for mail side. Nothing yet for Personalized Start Page.
http://www.downloadsquad.com/2009/04/01/gmail-t…
Yupp, i just notice themes being available as of yesterday. I don't particularly like any of them. I'm happy with the default.
very very very good post.. its help me too much..
thanks
mehedi
http://www.mehedibd.com
Helped you too much? 🙂
Thanks for the positive feedback … it keeps me going!
This is simply one of the best tutorials I've ever read. Thanks for your detailed and clear instructions.
best of luck to you in life and business!
Fantastic, it is one of the two or three that I've put the most effort into. I'm glad people are finding it useful.
Yes, you rock; I love it! This tutorial was well-written, and concise. And, voila! I have all of my business email setup in google apps. Thank you.
Fantastic!
Your article is great. I definitely want to use Google Apps for free “personalized” e-mail once I register my Domain. rnrnHere is something I just came across after reading your article.rnrnGoogle Apps has an option where you can register a Domain using one of Google’s business partners. The Google Apps help page states that they also set up your Domain for use with Google Apps (e.g., set up the MX records, etc.). So I take it that registering your Domain in this way would eliminate the need to go through all of the steps you list in your article.rnrnDo you see any downside to registering a Domain in this way?
Jimmy I haven’t tried that route. It certainly makes sense that Google could partner with others to automate this process. Would certainly be worth it if they charged, say $50 or less for the service.